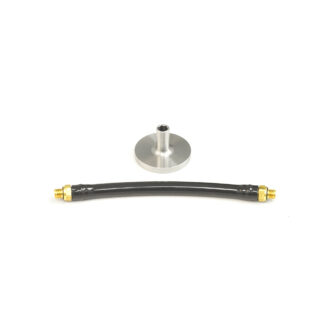
Buffer Tube Alignment

Does your WRAITH X buffer tube not line up perfectly with your upper receiver once you tighten it down? Don’t keep wrenching on it! Use a 2mm hex key to loosen the buffer tube from the regulator, orient it perfectly, and tighten it back down!

WRAITH Legacy Aero/PDW Installation (Video)

For detailed instructions on installing the WRAITH Aero or PDW for MTW, see the Owner’s Manual or follow along with Rich in this video.

Video transcript: so when you receive your Wraith arrow these are the basically the parts that you’re gonna get have your tank cover the stock stock face the regulator hardpoint adapter and then a toolkit that has a couple fittings your adjustment allen wrench as well as some phone rings which we don’t have pictured here first step in doing this installation is to install the hardpoint adapter so let’s go ahead and do that the next step is going to be to remove the stock buffer tube and to install the Aero parts now in this case we already have a race co2 on this gun but it works exactly the same way you need an Armorer’s wrench once done thread the buffer tube from the receiver then go ahead and separate the upper and lower receiver here you would have already done when you install the hardpoint now from our stock buffer tube we are going to need our castle nut that’s really the only thing we need from the stock buffer tube assembly take your regulator thread it into the back of the receiver now we want to thread it in as far as we can without protruding past the end here and so that you’re not your slot on the bottom of the regulator faces the bottom next we’re going to reinstall the detent and spring if those came out while you were working on the gun now we’re going to take the base notice there is a tab that lines up with the slot on the bottom of the regulator I’m just gonna slide that over pressing the spring for the detent the body pin detent down into the body of the gun making sure that we don’t bend it now we’re going to take our castle nut slide that over the regulator and thread that on to the gun now once we have snugged up the castle nut we’re gonna want to set it you can’t very well use the the armours wrench on this just because of the body here but what we’re gonna do is we’re gonna take a punch or in this case we’re just using an allen key and we’re gonna set it in the notch and we’re just gonna drive drive that around give it a little bit of tighten down make sure that you don’t drive down into the threads of the regulator okay that should be good and snug now and at this point we’re really installed we’ve got to do is top our pins we recommend from time to time putting a little bit of lubricant on the hard pointed after at the back there slide everything together good to go soccer just quickly about the stock here how this works is there’s a button on the bottom which releases the stock hey this is done for a couple of reasons one if you’re using an external airline rather than a tank here it allows you to use this as a multi-position collapsible stock so you can actually run an a si adapter on the back of the regulator here we run a remote line to a tank and run this as a collapsible stock if you so choose but in addition it lets us keep the design more streamlined because in order to install the tank you just push the button and pull the stock out and then we’ll take the tank thread it in take your stock slide it back on now let’s talk about tanks real quickly if you want to use the tank cover you are going to need to use a tank that has a rotatable collar for the threads like this ninja does what we can do is we can loosen up the screws that hold it in place you can actually install it like this then loosen those screws that hold it in place and then you would be able to rotate it until your eye your gauge is on the top surface because what we want is we want it rotated like this so when the tank cover goes on your gauge shows up right like that goes through this opening okay so that’s what we’re that’s what we’re going for here if you don’t particularly care about the the tank cover then most any tank will work you will just end up rotated different positions and you will almost certainly be able to find a position such that you don’t run into the the legs here with either the gauge or the fitting we’ve never really been had any trouble with that but do keep in mind if you want to use the tank cover you will want a type of tank that has an an indexable collar there so tournament lock is sliding collar here just like standard storm regulator in order to adjust the pressure you’re gonna slide it up use an allen key counterclockwise increases the pressure clockwise decreases the pressure once your chronoed where you need to be slide the collar down and you can put a zip tie around this area do note that in order to install the tank cover you will want this slid down then it all snaps together also notice that there is a QD sling point works with standard and QD style slings on the bottom side of the of the base here alright guys that’s it for today I hope that was helpful to you if you have any questions about how to install your wraith Aero setup tuning anything like that be sure to leave us a comment in the comment section below and be sure to check out the rest of the videos on MTW for tuning installation of various other modules and accessories as well

WRAITH Legacy CO2 Adapter Installation

Rich demonstrates how to install the WRAITH CO2 Adapter in conjunction with the Storm HighPressure and BOLT.

Video transcript: hey guys today we’re gonna take a look at how to set up the Wraiths co2 adapter and storm high-pressure rag for use with the bolt here before we get started and the tools we’re gonna want are a 7/16 wrench 1/2 inch wrench and a 9/16 wrench all right also will be helpful to have though it’s not strictly necessary a 3/8 allen wrench first let’s look at the regulator this is the storm high pressure regulator it comes in the box and this is the fitting that comes with your bolt has a mini push-to-connect fitting and then your QD fitting on this side so first thing we want to do is we want to break this apart this is going to take our 7/16 wrench on push-to-connect there are 9/16 wrench on the QD fitting and we’ll just break it apart so we can set the QD fitting aside we don’t need that and we have our push-to-connect next step is going to be to take the storm regulator the high pressure regulator and remove the QD fitting from this side in order to do that easiest thing to do is going to be to hit it with a heat gun and then use your half-inch wrench to loosen it there is a thread sealant on here that comes off a lot easier if you if you heat it up so we’re gonna go ahead and hit it with a heat gun and then remove the fitting so we went ahead and hit it with the heat gun at a pretty high heat for about thirty Seconds to a minute and then we put the regulator in the soft jaws on the vise which will put up a picture up here and used our half inch wrench and remove the fitting now we’re going to take the miniature push-to-connect fitting that we took off of our other QD fitting and we’re gonna put it in the port we just opened up on the regulator get our 7/16 wrench it’s not get down all right so now our regulator is all set let’s take a look at the great co2 adapter so for the race co2 adapter in order to get the proper puncturing process we need to set the length just like on the co2 stock the length is set by rotating these two parts here the threads there adjust the puncture length this is tightened all the way down as you can see we’re gonna back it off a little bit and then we’re going to put our cartridge in well first let’s go ahead and just attach this to our regulator we’re gonna attach to our regulator and we’re going to plug in the air line here so we have the air line for our Wraiths plugged in so we don’t just blow all the pressure through the system and we backed out our engagement our puncture pin engagement a little bit here and what we’re looking for is we want to be able to do this and move the cap all the way to the closed position without putting pressure on the puncture pin and then we’re just going to tighten it down we’re gonna tighten it down until it punctures like so so at this point the system is punctured it’s pressurized all we need to do at this point is we need to set our lock ring in order to prevent that adjustment from moving to do that we’re gonna start by just kind of snugging down the lock ring then don’t over tighten it right now because we’re still going to move it a little bit and then we’re going to go ahead and fire all the air are all the co2 out of the cartridge okay so we emptied the cartridge now we’re going to back up this length adjustment just a little bit you remember if you’ve watched the stock video we back it up one flat here we basically want to do the do the same thing we’re looking for about a sixth of a turn backed off we’re just gonna do right about like that now we’re going to tighten down our lock ring again at this point we’re going to unscrew the co2 adapter from the regulator being careful that we’re turning on this part not this part because if we turn over here we’re gonna change our adjustment again a little bit of pressure in there this is where the 3/8 allen key will come in handy as it will help us tighten that down a little more so again I’m gonna hold on the lock ring and I’m going to just tighten that down a little bit there so now I can put the whole thing back together for my my adapter back on the regulator and get a new cartridge I can see whether I have it set right and you see we pressurized and we are good to go now a good thing to keep in mind is while the lock ring does hold you pretty well in place it’s gonna be a good practice whenever you’re doing this whenever you’re snapping this down to try to hold on to the body here the flats give you some grip there to hold on to as opposed to holding down here because you might end up adjusting this without intending to the lock ring does a pretty good job of holding it in place but it’s not quite as secure as like in the stock where you have the set screw where it really just can’t move at all so again good practice gonna be to hold up here and snap that cap down I don’t remember whether I did that when I was I did this on video here right now but definitely that’s how you want to go about it at this point you’re all set up the whole thing will just slide inside the stocke and you are off to the races you can adjust your pressure obviously here like normal and that will let you set your pressure on your regulator to wherever you need again the storm high pressure will go up to 200 psi the system’s rated for for 180 but the storm high pressure will go up to around 200 and you can adjust it to set for the velocity that you need one other thing I want to mention real fast here is that today this wrench can come in handy and one other way well once you have this together you usually don’t need to take it apart that often if you need to remove the co2 adapter from the regulator this is a smooth surface here and it can be a little difficult to get a good handle on back it off the regulator if you get it on there tighter than you’re able to get off by hand you can disassemble the two halves and you can access that same hex port from the back side and then that’ll let you twist it to get a little more torque on there to break it loose hope that was helpful guys if you have any questions about this get in touch with us and we will do our best to answer them thanks for watching